Learn how to create a custom MCP (Model Context Protocol) server with .NET and integrate it into Visual Studio Code. Step-by-step guide with a simple code example.

Introduction
As GitHub Copilot and AI-powered agents become key components of modern development workflows, integrating custom logic into your IDE is more valuable than ever.
Model Context Protocol (MCP) is a new open protocol designed to let tools written in any language communicate with GitHub Copilot and Copilot extensions in Visual Studio Code. Using MCP, you can expose C# methods as callable tools, enabling AI agents like Copilot to invoke them directly from your local dev environment.
In this tutorial, you’ll build a working MCP server in .NET, create a custom weather tool, and expose it to Copilot inside VS Code—paving the way for your own intelligent workflows and domain-specific commands.
This is the first step toward building AI-enhanced .NET tooling, enabling your apps to speak Copilot’s language.
📦 Step 1: Create the MCP Server Project
Let’s start by setting up a new .NET console project:
dotnet new console -n WeatherMcpServer
cd WeatherMcpServer
Then, install the ModelContextProtocol.Server NuGet package:
dotnet add package ModelContextProtocol.Server🧠 Step 2: Create the MCP Server Logic
📄 Program.cs
This file sets up the MCP server, defines the transport protocol, and loads available tools from the assembly.
using Microsoft.Extensions.DependencyInjection;
using Microsoft.Extensions.Hosting;
using Microsoft.Extensions.Logging;

var builder = Host.CreateApplicationBuilder(args);

builder.Logging.AddConsole();

builder.Services
    .AddMcpServer()
    .WithStdioServerTransport()
    .WithToolsFromAssembly();

await builder.Build().RunAsync();
✅ This configuration (Console application) tells the server to communicate over stdio, which is how VS Code extensions typically connect to background services.
🌦️ Step 3: Add a Weather Tool
📄 WeatherTools.cs
This file defines a tool using the McpServerTool attribute, which can be invoked from VS Code once the server is connected.
using System.ComponentModel;
using System.Net.Http.Json;
using ModelContextProtocol.Server;
using System.Globalization;
namespace WeatherMcpServer;
[McpServerToolType]
public static class WeatherTools
{
private static readonly HttpClient httpClient = new();
[McpServerTool, Description("Get the current temperature in a city.")]
public static async Task<string> GetWeatherAsync(string city)
{
try
{
var geoUrl = $"https://geocoding-api.open-meteo.com/v1/search?name={Uri.EscapeDataString(city)}&count=1";
var geoResponse = await httpClient.GetFromJsonAsync<GeoResponse>(geoUrl);
var (lat, lon) = GetFormatedCoordinates(geoResponse, city);
var weatherUrl = $"https://api.open-meteo.com/v1/forecast?latitude={lat}&longitude={lon}¤t_weather=true";
var weatherResponse = await httpClient.GetFromJsonAsync<WeatherResponse>(weatherUrl);
var weather = weatherResponse?.current_weather;
return weather is null
? $"Could not retrieve weather data for {city}"
: $"Current temperature in {city} is {weather.temperature}°C with wind speed {weather.windspeed} km/h.";
}
catch (Exception ex)
{
return $"Error fetching weather: {ex.Message}";
}
}
private static (string lat, string lon) GetFormatedCoordinates(GeoResponse? geoResponse, string city)
{
if (geoResponse?.results == null || geoResponse.results.Length == 0)
throw new ArgumentException($"Could not find location for {city}");
var (lat, lon) = (geoResponse.results[0].latitude, geoResponse.results[0].longitude);
return (
lat.ToString(CultureInfo.InvariantCulture),
lon.ToString(CultureInfo.InvariantCulture)
);
}
public class GeoResponse
{
public GeoResult[] results { get; set; }
}
public class GeoResult
{
public double latitude { get; set; }
public double longitude { get; set; }
}
public class WeatherResponse
{
public CurrentWeather current_weather { get; set; }
}
public class CurrentWeather
{
public double temperature { get; set; }
public double windspeed { get; set; }
}
}🧩 Step 4: Configure VS Code
Add the following block to your settings.json (inside .vscode folder or workspace settings):
"mcp": {
  "servers": {
    "weather-mcp": {
      "type": "stdio",
      "command": "dotnet",
      "args": [
        "run",
        "--project",
        "C:\\code\\your-path\\WeatherMcpServer\\WeatherMcpServer.csproj"
      ]
    }
  }
}
Note: Make sure to replace the path with the actual location of your
.csprojfile.
In addition, you can create/configure a new «MCP Server» following the steps once click in this icon:


▶️ Step 5: Run and Test
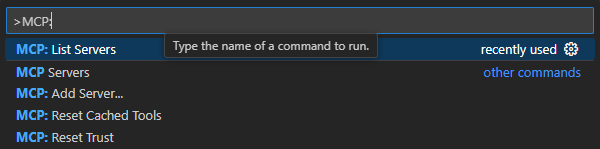
- Use the Command Palette (Ctrl+Shift+P).
- Search for:
MCP and select one of the next commands. - If you choose «List Server» then you will see a list of MCP servers to Start/Stop/… them.
- Also you can Start/Stop/… directly from the setting file:

Finally, if everything is up and running properly, you should get a response like this:

Note: Here («Continue») the AI agent require confirmation to continue using the new tool «GetWeather».
🧰 Troubleshooting
Here are some common issues and how to solve them:
✅ “Cannot connect to server”
Ensure the path in settings.json is correct and your project builds without error.
✅ Tool not appearing in command list
Make sure the class has [McpServerToolType] and the method has [McpServerTool].
🧭 Conclusion
You’ve just built your first .NET-based MCP server, exposed a custom tool, and integrated it directly into Visual Studio Code—but more importantly, you’ve taken the first step into the future of AI-powered development.
With Model Context Protocol (MCP), your custom C# methods are no longer just part of your backend logic—they become callable intelligent tools for GitHub Copilot and any compatible AI agent running inside VS Code. This opens the door to:
✅ Automating domain-specific tasks
✅ Creating AI-assisted workflows tailored to your stack
✅ Giving Copilot access to your logic, your APIs, and your data
Happy Coding / Vibe Coding / … and much more

Un comentario sobre “Extend GitHub Copilot in VS Code with Custom .NET Tools via MCP”