
Introduction
Writing effective unit tests is a crucial part of professional software development, especially in modern .NET projects. Lately, I have been refining my approach to unit testing by leveraging GitHub Copilot and the new Copilot Agents feature in Visual Studio Code.
Instead of manually writing every test, I discovered a powerful workflow where AI assists in generating, executing, and iterating on tests — dramatically improving both speed and quality.
In this article, I’ll show you how to maximize GitHub Copilot for writing professional unit tests in .NET applications, using xUnit, Shouldly, NSubstitute, and AutoFixture. I’ll guide you step-by-step through creating a practical API example, setting up a clean testing environment, and crafting an effective prompt that helps Copilot act like a real developer on your team.
Whether you’re new to AI-assisted testing or you’re looking to level up your .NET unit testing practices, you’ll find actionable insights and ready-to-use examples here!
Let’s dive into the future of development with Copilot Agents! 🚀
Why the Right Prompt Matters
At first, when I gave Copilot very generic instructions, it generated basic or sometimes messy tests. They often missed critical business logic paths or produced unreadable assertions.
By refining my prompts to set clear and specific expectations, the quality of the generated tests improved dramatically. Now, Copilot helps me create unit tests that are structured, readable, and aligned with .NET best practices.
Having the right prompt not only helps generate better code but also ensures maintainability and clarity in the long run.
Understanding AI Agents and How They Help with Unit Testing
With the advent of GitHub Copilot Agents, working with AI has become much more interactive and powerful. Unlike traditional Copilot suggestions, Agents act more like smart collaborators: they are capable of planning, writing, running, and iterating code autonomously based on the context you provide.
When using Copilot Agents in Visual Studio Code for unit testing, the workflow becomes truly transformative:
- ✍️ Agents generate the initial test file for the selected service (e.g.,
LoanEvaluationService), based on your custom prompt. - 🛠️ Agents automatically run the unit tests after generation to verify if they compile and pass.
- 🔄 If there are errors, the Agent will:
- Analyze the compilation or runtime errors.
- Update and fix the tests accordingly, while respecting your testing best practices.
- Rerun the tests again.
- 🔁 The Agent will iterate through this cycle automatically until:
- All the tests compile.
- All the tests pass successfully.
- Or, after a numbers of retries when it ask about «continue» or «pause» iterations.
This intelligent iteration process saves a tremendous amount of time and effort, ensuring that the unit tests are not only created quickly but are also reliable and maintainable.
Next, let’s dive into building a practical API example that we can test thoroughly using this approach!
Building a Example API
To showcase how this works in practice, I created a realistic .NET 9 Minimal API called CopilotTester with a LoanEvaluationService that contains business logic for evaluating loan applications. This scenario includes various conditions and rules that make it perfect for writing thorough unit tests.
As usual you can find the all code here, in this 🐙 Github repo.
🔨 Steps to Create the API and Test Projects
Create the API project
mkdir CopilotTester && cd CopilotTester
dotnet new web -n CopilotTester
Create the test project
dotnet new xunit -n CopilotTester.UnittestAdd the test project to the solution (if using a solution file)
dotnet new sln -n CopilotTester
dotnet sln add CopilotTester/CopilotTester.csproj
dotnet sln add CopilotTester.Unittest/CopilotTester.Unittest.csproj
Add project reference
dotnet add CopilotTester.Unittest/CopilotTester.Unittest.csproj reference CopilotTester/CopilotTester.csprojAdd NuGet packages to test project
dotnet add package AutoFixture.AutoNSubstitute
dotnet add package AutoFixture.Xunit2
dotnet add package NSubstitute
dotnet add package Shouldly
📄 Program.cs
using CopilotTester.Models;
using CopilotTester.Services;

var builder = WebApplication.CreateBuilder(args);

builder.Services.AddOpenApi();

builder.Services.AddScoped<ILoanEvaluationService, LoanEvaluationService>();
builder.Services.AddScoped<ICreditScoreService, DummyCreditScoreService>();
builder.Services.AddScoped<IIncomeVerificationService, DummyIncomeVerificationService>();

var app = builder.Build();

if (app.Environment.IsDevelopment())
{
    app.MapOpenApi();
    app.UseSwaggerUI(options =>
    {
        options.SwaggerEndpoint("/openapi/v1.json", "Loan Evaluation API V1");
    });
}

app.UseHttpsRedirection();

app.MapPost(
    "/evaluate", (LoanApplication application, ILoanEvaluationService service) =>
    {
        var result = service.Evaluate(application);
        return Results.Ok(result);
    });

app.Run();
All models and services like
LoanApplication,LoanEvaluationResult,EmploymentStatus,ILoanEvaluationService, etc., are properly modularized underCopilotTester.ModelsandCopilotTester.Servicesnamespaces.
📄LoanEvaluationService
public class LoanEvaluationService(
    ICreditScoreService creditScoreService,
    IIncomeVerificationService incomeService)
    : ILoanEvaluationService
{
    public LoanEvaluationResult Evaluate(LoanApplication application)
    {
        if (application == null)
            throw new ArgumentNullException(nameof(application));

        if (application.Amount <= 0)
            return LoanEvaluationResult.Denied("Invalid loan amount.");

        if (application.LoanTermMonths is < 6 or > 84)
            return LoanEvaluationResult.Denied("Loan term must be between 6 and 84 months.");

        if (application.Age is < 18 or > 70)
            return LoanEvaluationResult.Denied("Applicant must be between 18 and 70 years old.");

        if (application.EmploymentStatus is not
            (EmploymentStatus.Employed or EmploymentStatus.SelfEmployed))
            return LoanEvaluationResult.Denied("Unacceptable employment status.");

        if (application.HasPreviousDefaults)
            return LoanEvaluationResult.Denied("Applicant has a history of defaults.");

        var creditScore = creditScoreService.GetScore(application.CustomerId);
        if (creditScore < 600)
            return LoanEvaluationResult.Denied("Low credit score.");

        var income = incomeService.GetMonthlyIncome(application.CustomerId);
        if (income <= 0)
            return LoanEvaluationResult.Denied("Income could not be verified.");

        var monthlyInstallment = application.Amount / application.LoanTermMonths;
        var debtToIncomeRatio = (application.MonthlyDebt + monthlyInstallment) / income;

        if (debtToIncomeRatio > 0.4m)
            return LoanEvaluationResult.Denied("High debt-to-income ratio.");

        if (application.Amount > income * 12)
            return LoanEvaluationResult.Denied("Loan amount exceeds annual income.");

        return LoanEvaluationResult.CreateApproved();
    }
}
This service evaluates applications based on multiple criteria:
- Invalid loan amount
- Loan term not between 6 and 84 months
- Age not between 18 and 70
- Employment status must be «Employed» or «SelfEmployed»
- Previous loan defaults
- Credit score must be 600 or higher
- Verified income must be positive
- Debt-to-income ratio must be <= 40%
- Loan amount must not exceed annual income
If all conditions pass, the loan is approved. This provides at least 10-15 meaningful test scenarios.
🚀 Using GitHub Copilot and Copilot Agents to Write Tests
Once the API is ready, it’s time to leverage Copilot to write professional unit tests.
✨ Step-by-Step to Use the Prompt
- Open
CopilotTester.Unittestproject in Visual Studio Code. - Use (Copy & Paste) the following prompt inside VS Code Chat or Copilot sidebar
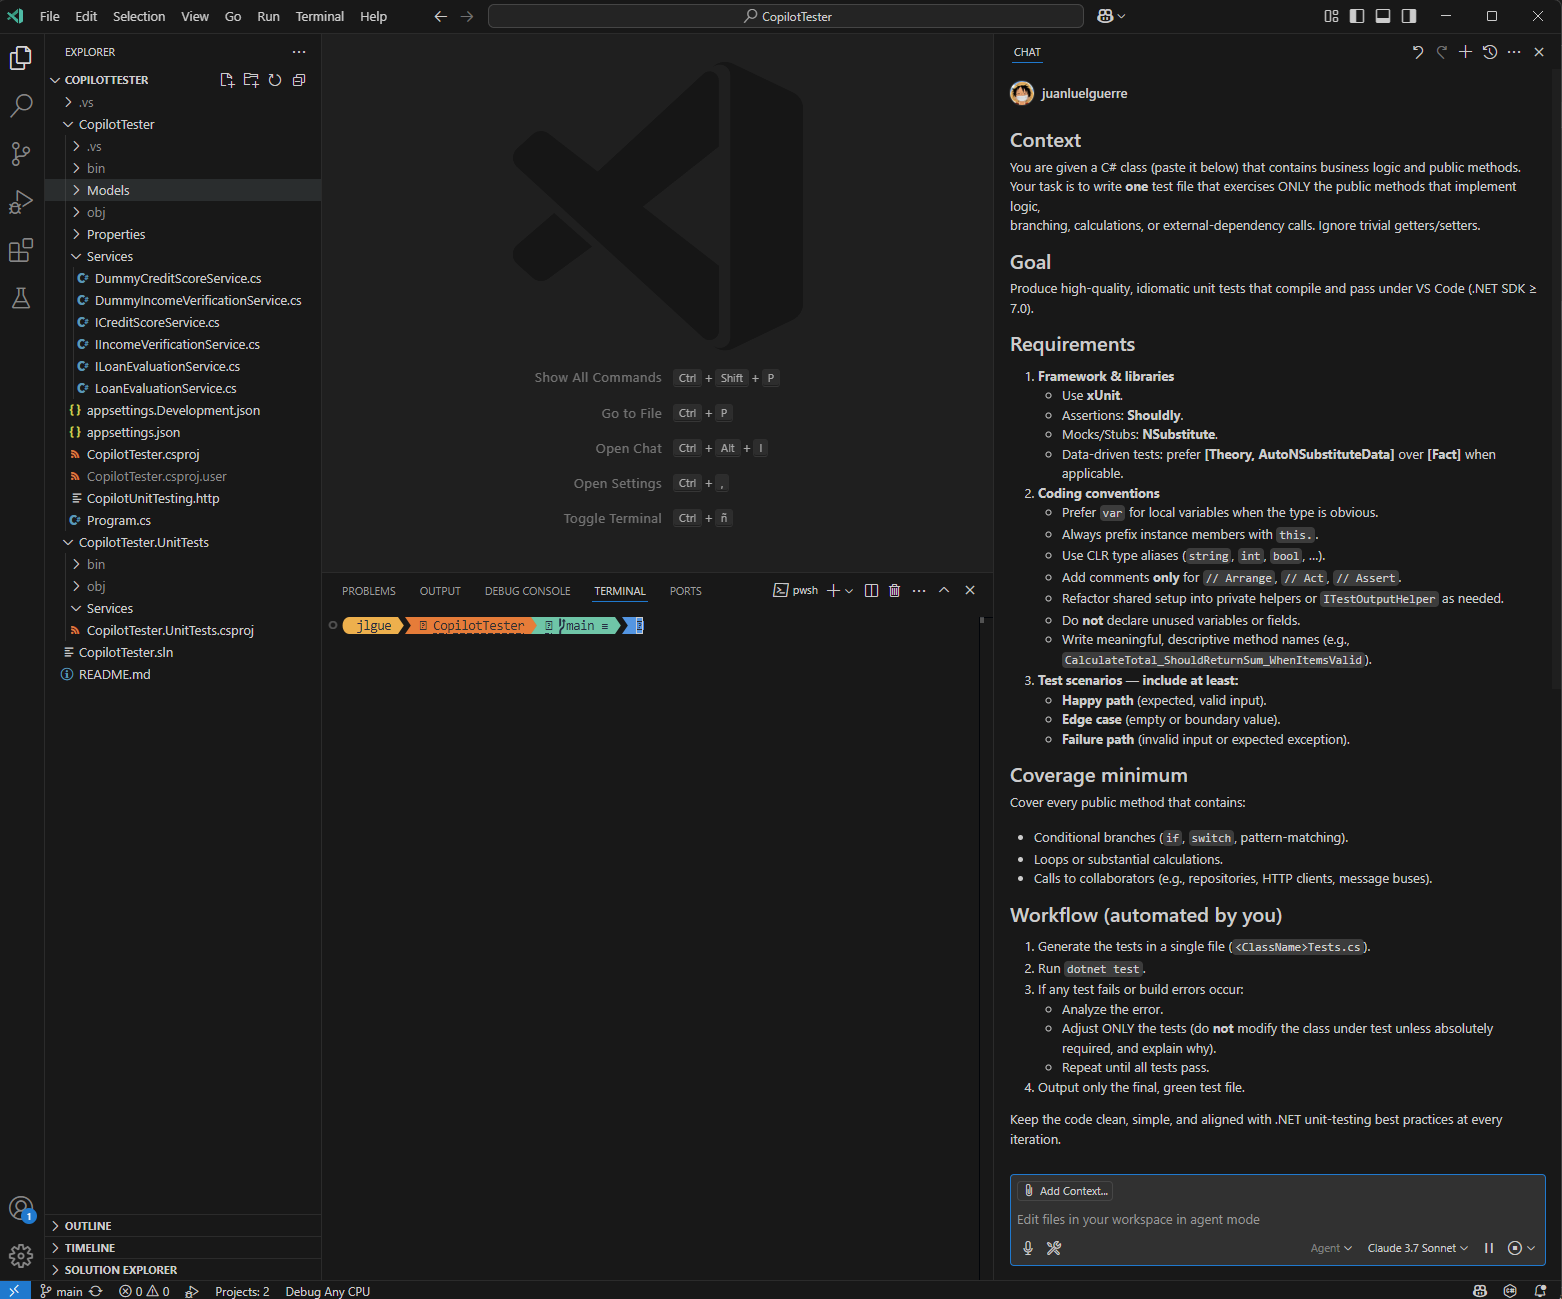
✍️ PROMPT
Context
You are given a C# class (paste it below) that contains business logic and public methods.
Your task is to write one test file that exercises ONLY the public methods that implement logic,
branching, calculations, or external-dependency calls. Ignore trivial getters/setters.Goal
Produce high-quality, idiomatic unit tests that compile and pass under VS Code (.NET SDK ≥ 7.0).
Requirements
- Framework & libraries
- Use xUnit.
- Assertions: Shouldly.
- Mocks/Stubs: NSubstitute.
- Data-driven tests: prefer [Theory, AutoNSubstituteData] over [Fact] when applicable.
- Coding conventions
- Prefer
varfor local variables when the type is obvious.- Always prefix instance members with
this..- Use CLR type aliases (
string,int,bool, …).- Add comments only for
// Arrange,// Act,// Assert.- Refactor shared setup into private helpers or
ITestOutputHelperas needed.- Do not declare unused variables or fields.
- Write meaningful, descriptive method names (e.g.,
CalculateTotal_ShouldReturnSum_WhenItemsValid).
- Test scenarios — include at least:
- Happy path (expected, valid input).
- Edge case (empty or boundary value).
- Failure path (invalid input or expected exception).
Coverage minimum
Cover every public method that contains:
- Conditional branches (
if,switch, pattern-matching).- Loops or substantial calculations.
- Calls to collaborators (e.g., repositories, HTTP clients, message buses).
Workflow (automated by you)
- Generate the tests in a single file (
<ClassName>Tests.cs).- Run
dotnet test.- If any test fails or build errors occur:
- Analyze the error.
- Adjust ONLY the tests (do not modify the class under test unless absolutely required, and explain why).
- Repeat until all tests pass.
4. Output only the final, green test file.
Keep the code clean, simple, and aligned with .NET unit-testing best practices at every iteration.
3. Execute and wait. This is the initial code generation by Copilot:
4. Once Copilot has generated the tests, it tries to run them on the terminal using “dotnet test”, after confirmation from you.

Note: If you see a warning like «No test is available», make sure the
[Theory]and[AutoNSubstituteData]attributes are correctly used, and that test discovery settings are properly configured.
5. Copilot keeps iterating because a warning is encountered so, we can either enhance the prompt a bit more to avoid it or we can continue with it and then we can choose «keep» and «Continue» if after a while it has not been fixed. In the end it is just a warning not an error and the tests, as we can see below, all pass.

You can confirm by yourself all tests pass and analyze the tests created are already a valid tests.
Conclusion
After working deeply with GitHub Copilot and its Agent mode in Visual Studio Code, here are my personal and honest conclusions:
- ⏳ When will Agent Mode be available for Visual Studio? Not yet, unfortunately. We’ll need to be a little patient. For now, VS Code users have the advantage!h.
- 📝 If you already have a working example test, make sure to provide it as part of the prompt. If you don’t have one initially, once you manually create or fix one, pass it along in your next prompts. This helps Copilot learn your desired style and structure more effectively.
- 🔍 If the code you’re trying to test doesn’t expose its dependencies clearly (e.g., lacks interfaces or external components) or if Copilot cannot properly analyze its logic, you’ll need to guide it more carefully with your prompt. Otherwise, Copilot might struggle to finish the iterations and resolve errors by itself.
- ♻️ If a test doesn’t pass after several automated iterations, Copilot will continue trying. However, if after a reasonable number of attempts it doesn’t succeed, it’s better to jump in, fix it manually, and move on to the next test or class. It’s about keeping momentum.
- 🧩 You can generate all the tests for an entire project at once, but based on my experience, it’s much better to work class-by-class, especially if they are complex. You know the saying: «Divide and conquer!»
- 🧘♂️ While Copilot is working on writing or fixing your tests, you can focus on other tasks. It feels like having a smart junior developer assisting you in the background.
Happy A.I. Testing !
