
In this blog post, we’ll explore how to leverage the new Phi-3 Vision model within a .NET application. I’ll walk you through the entire process from downloading the model to writing and executing the code.
Step 1: Download the Phi-3 Model
To get started, we need to download the Phi-3 Vision model using the huggingface-cli tool. This tool allows us to easily fetch models from Hugging Face’s repository. Open your terminal and run the following command:
huggingface-cli download <model-name>Make sure to replace <model-name> with the actual name of the Phi-3 Vision model. For example if you’re placed at «c:\phi-3\models»:
huggingface-cli download microsoft/Phi-3-vision-128k-instruct-onnx-cpu --include cpu-int4-rtn-block-32-acc-level-4/* --local-dir .
This will download the model to your local machine. We’ll use the path of this model in our .NET application.
Step 2: Setting Up the .NET Project
Next, we need to create a .NET project. Open your terminal and navigate to the directory where you want to create the project. Run the following commands:
dotnet new console -n Phi3VisionApp
cd Phi3VisionApp
Now, we need to add the Microsoft.ML.OnnxRuntimeGenAI NuGet package to our project. Run:
dotnet add package Microsoft.ML.OnnxRuntimeGenAIThis package provides the necessary tools for integrating ONNX runtime and processing AI models in .NET.
Step 3: Writing the Code
Create a new file named Program.cs in the Phi3VisionApp directory with the following content:
using Microsoft.ML.OnnxRuntimeGenAI;

namespace Phi3Vision;

public static class Program
{
    public static void Main(string[] args)
    {
        Console.WriteLine(@"--------------------");
        Console.WriteLine(@"Hello, Phi-3-Vision!");
        Console.WriteLine(@"--------------------");

        Run(@"C:\phi-3\models\cpu-int4-rtn-block-32-acc-level-4");
    }

    private static void Run(string modelPath)
    {
        using var model = new Model(modelPath);
        using var processor = new MultiModalProcessor(model);
        using var tokenizerStream = processor.CreateStream();

        var fileImagePath = Path.Combine(Directory.GetCurrentDirectory(), "images",
            "PlayingWithAspire.png");
        if (!File.Exists(fileImagePath))
        {
            Console.WriteLine(@"Image not found.");
            return;
        }

        var images = Images.Load(fileImagePath);

        const string text = "What do you see in the picture?";
        var prompt = "\n";
        if (images != null)
        {
            prompt += "\n";
        }

        prompt += text + "\n\n";

        Console.WriteLine(@"Processing image and prompt...");
        var inputTensors = processor.ProcessImages(prompt, images);

        Console.WriteLine(@"Generating response...");
        using var generatorParams = new GeneratorParams(model);
        generatorParams.SetSearchOption("max_length", 3072);
        generatorParams.SetInputs(inputTensors);

        using var generator = new Generator(model, generatorParams);
        while (!generator.IsDone())
        {
            generator.ComputeLogits();
            generator.GenerateNextToken();
            Console.Write(tokenizerStream.Decode(generator.GetSequence(0)[^1]));
        }
    }
}
Step 4: Running the Application
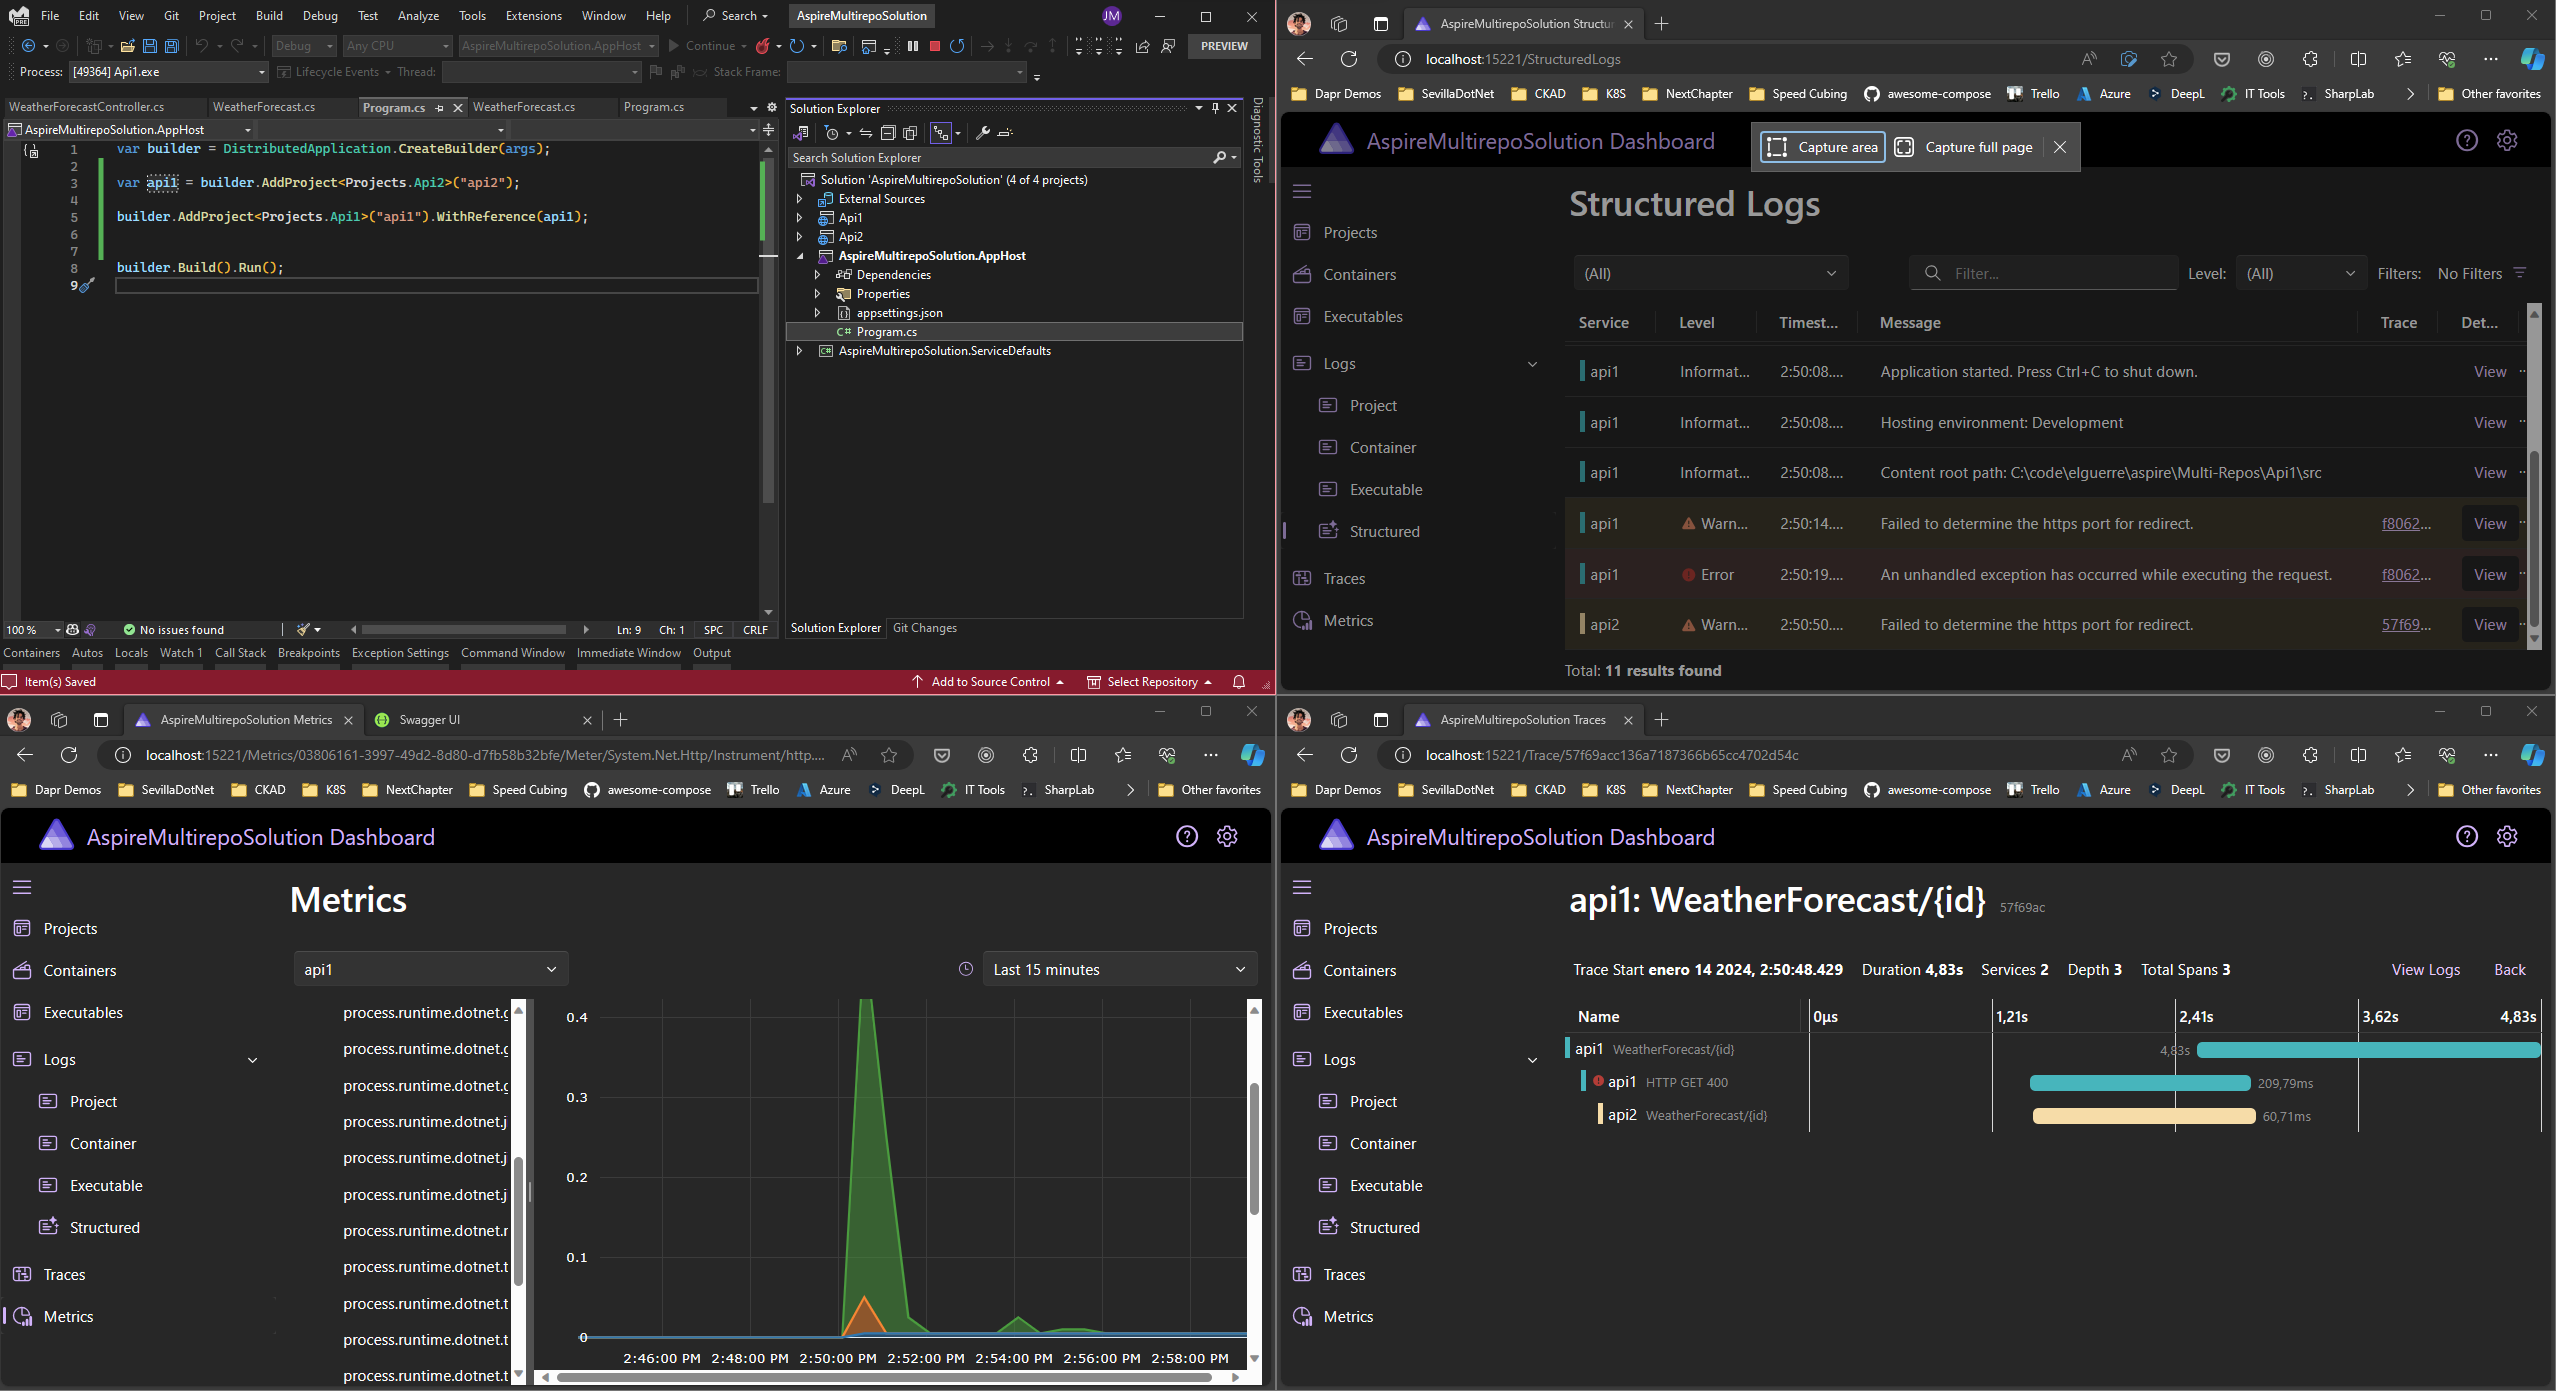
Before running the application, make sure you have an image named PlayingWithAspire.png in an images directory within your project’s root. This image will be used for processing and this one is this (I’ve previously posted it in twitter about Aspire, Metrics and so on):
Now, you can run your application with:
dotnet runOutput
When you run the application, you should see the following output:
--------------------
Hello, Phi-3-Vision!
--------------------
Processing image and prompt...
Generating response...
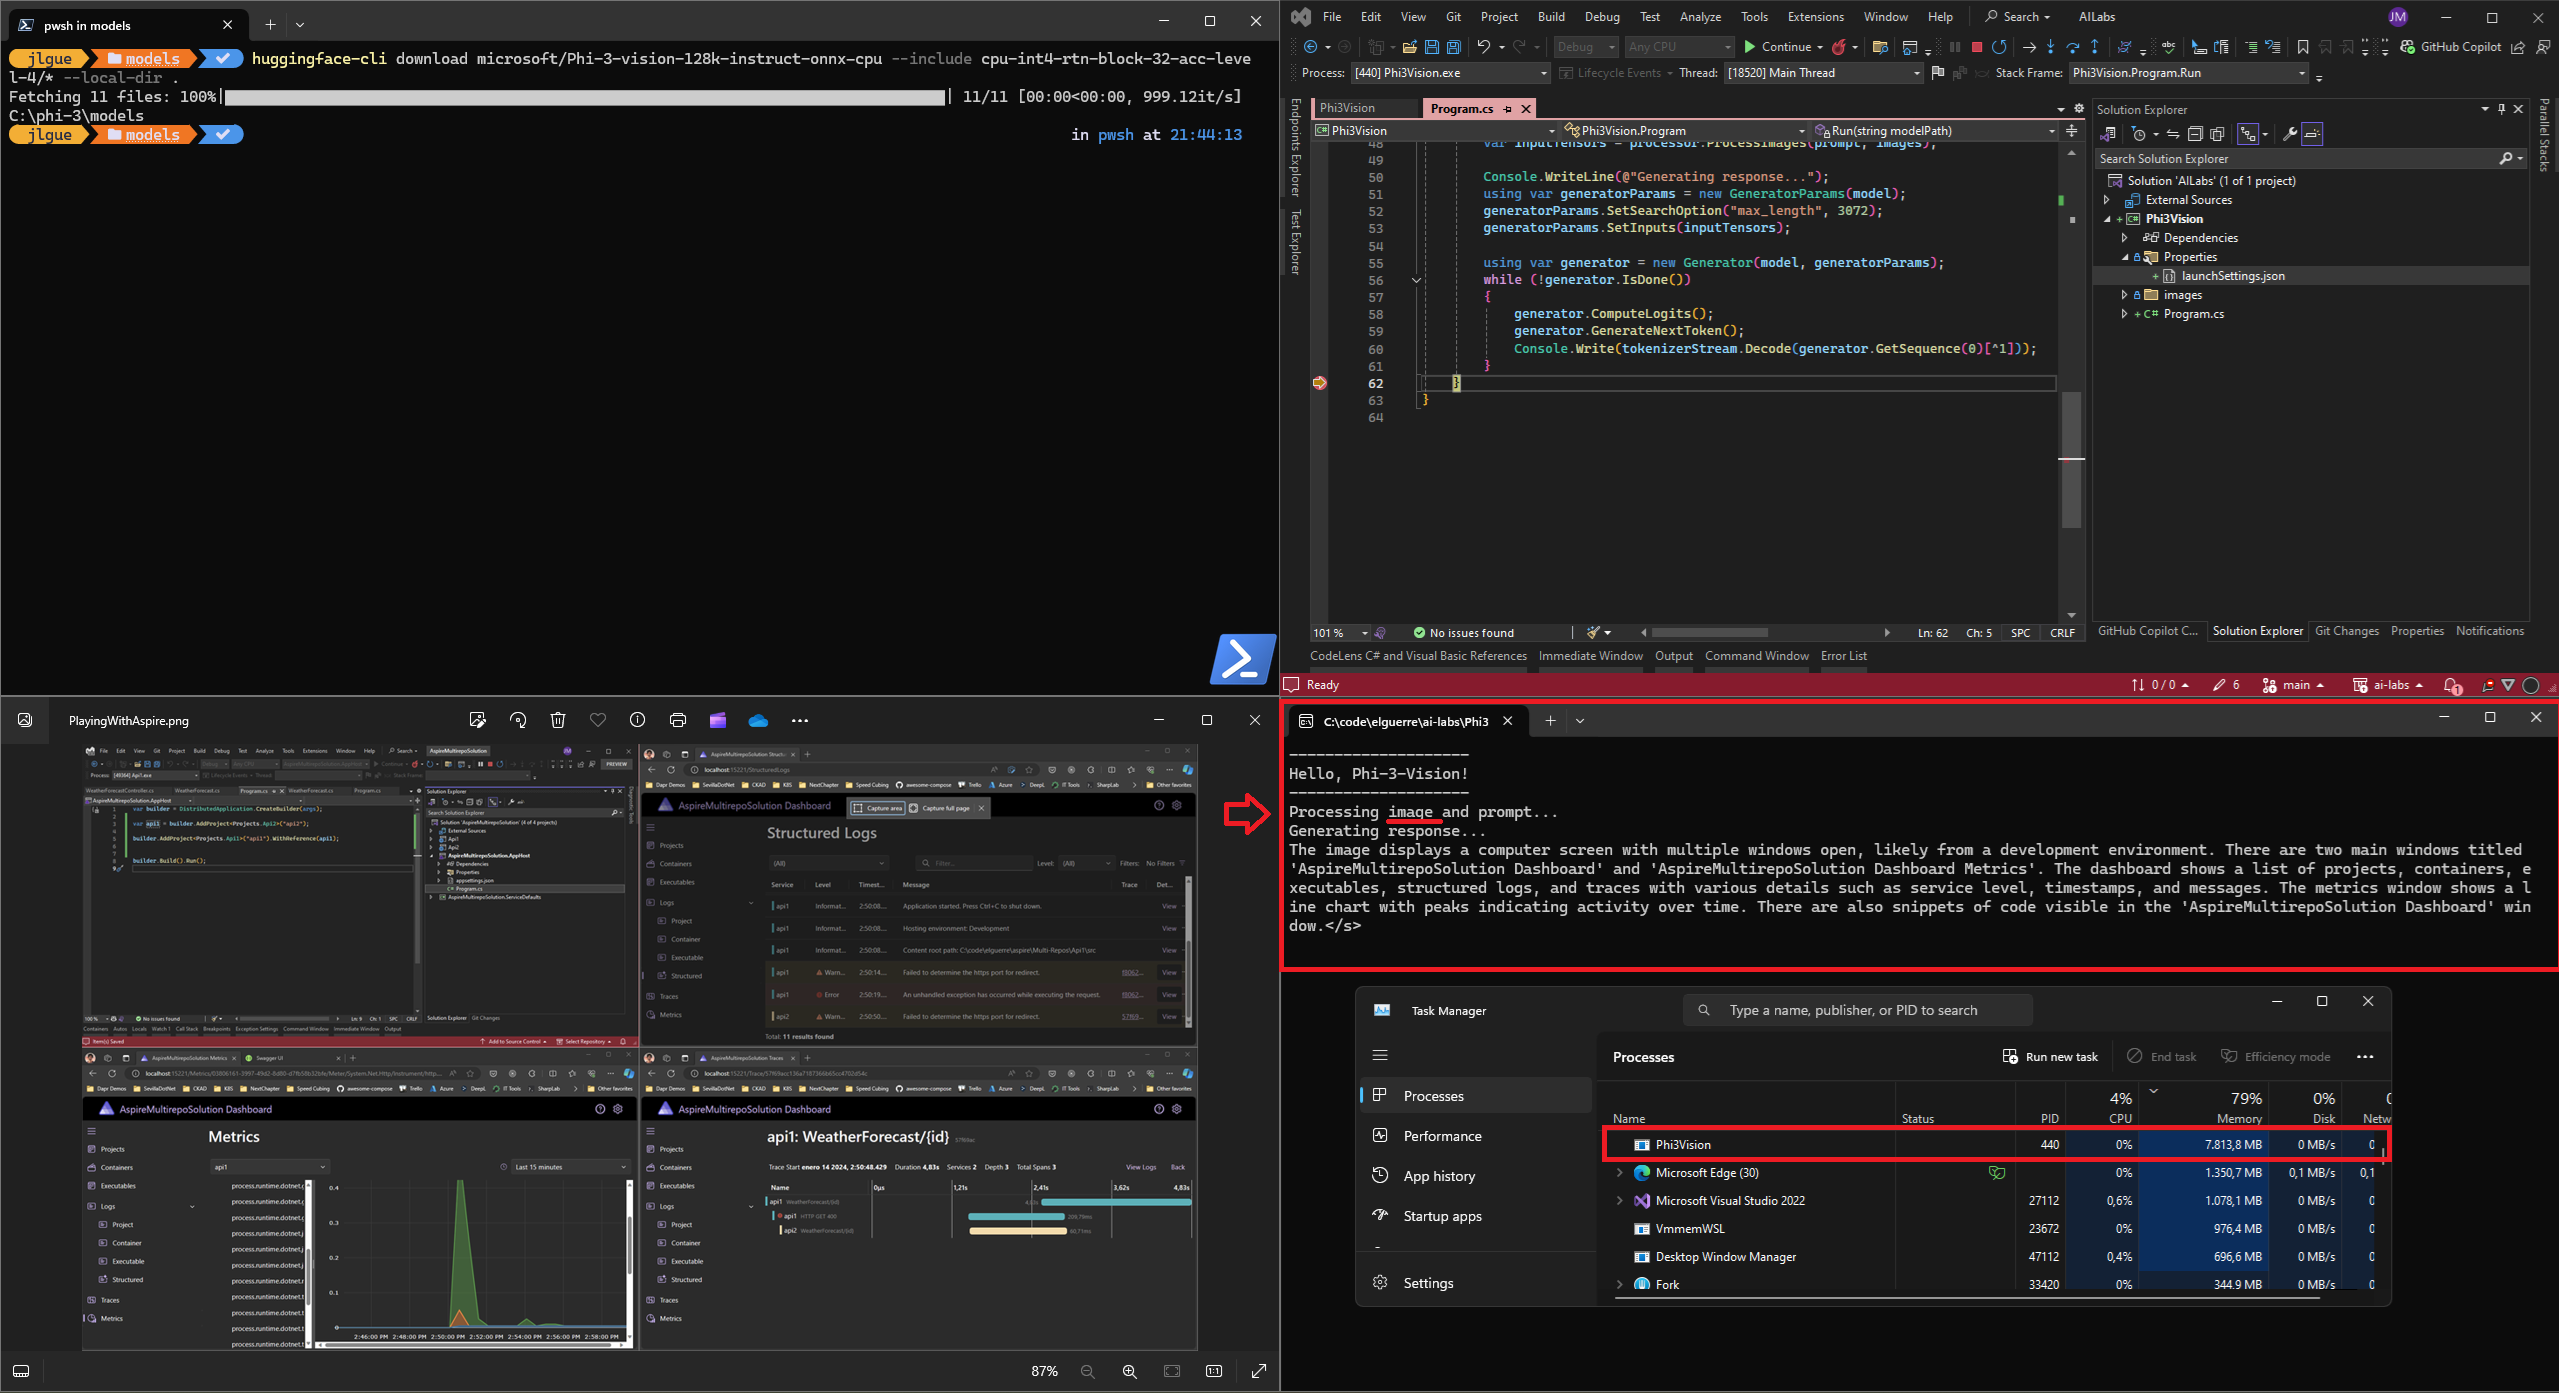
The image displays a computer screen with multiple windows open, likely from a development environment. There are two main windows titled 'AspireMultirepoSolution Dashboard' and 'AspireMultirepoSolution Dashboard Metrics'. The dashboard shows a list of projects, containers, executables, structured logs, and traces with various details such as service level, timestamps, and messages. The metrics window shows a line chart with peaks indicating activity over time. There are also snippets of code visible in the 'AspireMultirepoSolution Dashboard' window.
This output demonstrates how the Phi-3 Vision model analyzes the image and generates a detailed description of its content.
Conclusion
And here the result as a recap in just one screenshot:
In this post, we demonstrated how to integrate and utilize the Phi-3 Vision model in a .NET application for image analysis. With the power of ONNX and .NET, you can build robust AI-powered applications that leverage state-of-the-art models for various tasks.
Happy coding!

Very nice work, gave me some neat idea how this can be used in real-world business scenario. When trying with my own prompt, I got this error «Number of unique image tags does not match the number of images». There seems to be a github issue here: https://github.com/microsoft/onnxruntime-genai/issues/712 . I fixed my prompt by replacing textual image reference with «<|image_1|>» literal.
Me gustaLe gusta a 1 persona